LinkSys is a very popular brand of home routers manufactured by Cisco. These may be wireless routers, DSL routers, and cable routers.
LinkSys routers are fairly simple to setup, even for inexperienced users.
LinkSys Router Setup
Physical Setup of a LinkSys Router:
Even though the different models of LinkSys routers may differ, the general design for setup is very similar for all of them.
- Attach the antennas to the router (for wireless routers).
- Plug the Ethernet cable from your broadband Internet provider’s modem into the port labeled “Internet” or “WAN” on the Router.
(Note: The “Internet” and other ports are usually located at the back of the Router) - Plug another Ethernet cable into one of the available ports (usually numbered 1,2,3,4, etc.).
- Then plug the other end of this cable into an Ethernet port on your PC.
LinkSys Router Configuration
LinkSys routers now ship with a Setup Wizard which is intended to simplfy basic configuration tasks.
We do not recommend the LinkSys Setup Wizard for two reasons:
- The Setup Wizard is not significantly easier than the regular configuration menus
- If you use the Setup Wizard, you will end up learning two interfaces for your LinkSys router instead of just one
The best course of action would be to open your web browser (Mozilla Firefox, Internet Explorer, etc.) and enter the following URL: http://192.168.1.1/
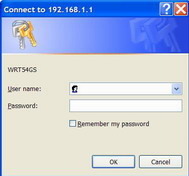
You will now be prompted to enter your Username and Password.

Logging in to a LinkSys Router
Logging in to a Linksys Router
Leave the Username field blank and enter your Router’s password (the default password is "admin").
Once you are past the login screen, you have access to (and can change) a plethora of configuration options for your router.
Don't be worried by the enormous number and variety of options, your LinkSys router ships with default settings that enable it to work right out of the box in most environments.
From here the configuration options that you choose are largely up to your own personal preference.
If this is a wireless router, we recommend that you consider setting an SSID to identify the router as your own and configuring WEP to encrypt your wireless traffic.
Setting-Up a DSL ISP on a Linksys Router
After you’ve entered the URL 192.168.1.1 in your web browser and the web-based setup page appears, follow these steps:
- Look for “Local IP Address” and change it to “192.168.2.1” (usually under Setup à Basic Setup)
- Click “Save Settings”.
- Renew your computer’s IP Address as follows:
i. Go to MS-DOS or Command Prompt; click the Start button, click on "run command", type in "cmd" (without quotations), and press enter
ii. Type in “ipconfig/release” and press Enter on your keyboard.
iii. Your IP Address will consist of 0’s , i.e. 0.0.0.0
iv. Now type in “ipconfig/renew” and press Enter on your keyboard.
v. Your IP Address will now be displayed, e.g. 192.168.10.10 - Access the Router’s web-based setup page by typing the 192.168.2.1 in the URL of your web browser.
- Once the web page appears, click on “Status” and check whether the “IP Address” field has a series of numbers or 0’s.
- If the IP Address has numbers, you can now connect to the Internet.
- However, if the IP Address has 0’s, first click either on “DHCP Release” or “IP Address Release” and then click on “DHCP Renew” or “IP Address Renew” accordingly.
- If the IP Address still comprises only of 0’s, enable PPPoE on the router as follows:
i. Click “Setup” on the Router’s web-based setup page.
ii. Go to “Internet Connection Type” and change the option to “PPPoE”.
iii. Enter the Username and Password as provided by your ISP , along with the domain in the username if necessary.
iv. Click “Save Settings”. - Now click “Status” and see if the “Login Status” displays Connected.
- If not, click on Connect.
You should now be able to connect to the internet using your LinkSys Router.
download indonesia
LinkSys

0 comments:
Post a Comment